Monday, December 10, 2012

Hi everyone!

December and Christmas are fast approaching! And Thank God that we already set-up our Christmas tree and some decors inside of our love nest. But not outside it is ice cold out there!

Well, Christmas is not complete if we do not have any banners or some decors made by my hands. So, using my Silly and Big K buddies I have my cutes and sweetest banner and garland. At long last, I finished our banner. I starts doing this August. Because of orders and going somewhere it took months before it's done. 


I have four designs when I am starting doing this. And I ask my husband which of those he likes. So he chose this design and he suggests the holy berries. 


I embossed background and the leaves cardstocks. I really like the results of embossed on the holly berries leaves. It looks like a leaves. I used also Glossy Accents for the berries so that it will standout and looks glossy. Oh I add red glitters on it. I love glitters.


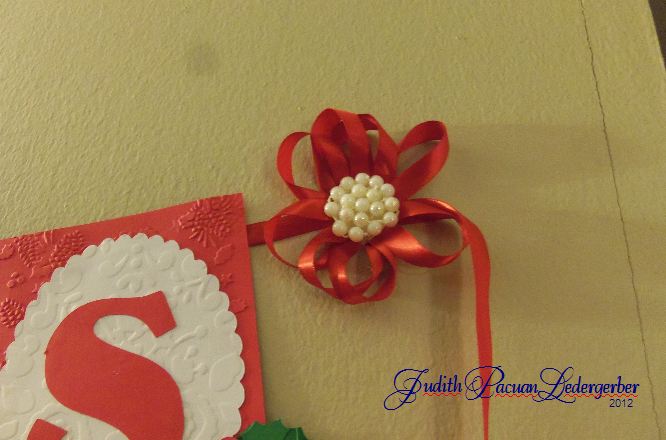
Mema (my husband grandmother) gave me an assorted colors of beads. She thinks of me when she saw that beads. She said "I know you can do something for this for your crafts". What a sweet isn't it? Then I used those beads on bows using hot glue. In this picture was kinda perfect others is not a little bit ok but they are still cute. It looks so elegant to my eyes! 

This banner gives me idea to make another banner but not for Christmas but for girls birthday banner. I hope I find those beads in Acmoore, Joann's or Michaels. Help me please!


This not a cake. In this picture it looks like a cake. 
These are my cutee pieces for garland. While watching tv last night I am thinking I want to make a garland like those circle garlands that I used to see on those parties. Then I said "Christmas, Circle, Scallop minus my Silly and Big K buddies". 


Then it came out to my mind how about using the scallop and circle punches. It so cute! I grabbed all those scrap papers and punches. Start punching and that's it. I have dress of Santa and his face with bonnet.


Scallop punch is about 2" and circle punch is about 1" only. I cut the scallop punch into 2 and adhered them both and make some effect on the top to give some dimensions. Same also in circle punch. I put silver glitter to give some drama or glittering. 
For the belt, I cut 1/4" for black and use manually cut the yellow cardstocks using my exacto knife. Patient is virtue again. Then gold glitter on his belt.


I used the floss thread to connect them and trim it so that it won't look messy. I want to emphasize or focus would be on the santa's dress only.


When I hanged it I noticed that I should do it back to back so that I wouldn't adjust it facing front. 
 

This is so cute and sweet in person.

Thank you for looking. Oh I have another one. I hope I can do it NOW!

Bye!


Tuesday, November 27, 2012

Personalized Banner for a Baby Boy Version

Hi everyone!

Here's my personalized banner for baby boy. 
There's a customers in eBay saying how about a version for a boy? Hmmm I been thinking that too. So, I make a design first in my baby Silhouette Cameo. Then went to Acmoore and Joann's Fabric and Craft for cardstocks for boys.


So that's it I got this DCWV cute cardstock that is glittered and printed design that suited for my design. There's an assorted colored buttons and floss thread too. Ooops, before I forget the collar. I bought also a cardstock teal color at Staples because it's kinda thick. And last the blue dotted nylon ribbon,


For this banner, the customer choose only the shades of sage, teal, brown and blue. On the original design of this banner it has red and orange. She did reminds me of the stitching and collar. I love it!


Even the buttons I stitch it. Because I want to show the thread on it. I want it to make it as real polo shirt. 
The reason why I placed the letters at the right side is because of it reminds me real shirts logo. It was always at the right sides. Though stitching is allows you to give time I really do it. Even in collar I stitched that too. I want cute and different.


I added assorted colored buttons and stitched the sleeves. I have also collar that will look like a polo shirt. Though it quite giving time but I love it when it is finished. So cute!


I added bow made of cardstock too. I learned that bow from the websites that teaches you how to make a bow and it has a template for bow, too. In my "It's a Girl" banner I used flower made out of ribbon. But here I used cardstocks only,


Look the design..Isn't so cute?!


The ribbon is 1/4" only nylon. Ribbon is teal color made of cardstocks. I got that idea of making a bow from Youtube and email too.


And this is my Thank You note card for my customer. I love that too with matching rhinestones at the sides. 


If interested you can email me at det20169@yahoo.com.
More pictures at www.facebook.com/dethsgreetings
You can order also on that page,
Thank you for looking!
Happy crafting everyone


One of the Cutest Thank You Card that I made


Good day! Here I am again showing one of my cards. My cutest Thank You card that I made. 
These are made from special patterned cardstocks and premium cardstocks. I added ribbon in a different technique and cute buttons. 
I always saw adding buttons on the cards so I said once I am making a card I will add also a button.  So this is it! 
By the way, this is just only a full length size card 4.50" by 5.50"


Before I cut the cardstocks I use my Silhouette Cameo software for drawings. So that I have a guide or template for my design. But in this designs, I didn't follow what's on my sketch I follow my mind to this and that. I said, I want to use my "Embossing Thank You folders" from Sizzix. That Thank You embossing folder was so cute and I am so fascinated on it. So I said I want to have a thank you card out of this embossing thank you folder.
And from the Youtube tutorials and uploaded pictures of cards I saw that ribbon technique bow. It gives me idea. I said again..I want that on my card plus the buttons. And of course the belt.


The scalloped square and oval shapes gives cuteness on these cards too. 


When I am done on layering and adhering these cardstocks I have a little bit problem on the background color. I said I want happy color that will match on that embossed Thank You So Much. So, that's it I used the yellow. The real color of base cardstock is white. What I did, I used the technique of distressing. I used the foam and the Ink It Up stamps yellow color and distress the sides of that cardstocks.

I love and I am happy doing it. And I became more happy when I see the final result of these cardstocks. Finally, the color combinations are good, the prints on the cardstocks are balance as 
well as the shapes.

This Embossed Thank You Cards can be used in all occasions. If interested you can email me here or at det20169@yahoo.com. There are lots of pictures at www.facebook.com/dethsgreetings

Happy Crafting!


Tuesday, October 9, 2012

Thank You Tag for Birthday Boy

My tags for birthday boy. Made from bazzill cardstock and granite specialty paper. I am happy that I made it a little bit perfect using my baby Silly. Print and cut again. I pay attention on clicking the command so that I won't waste any paper. I used again the command Text to Path. Oh I love my Silly babe!


Sunday, October 7, 2012

Blue for the Michael's Blessed Day

My friend was looking for me to help her to decorate on her son's celebration. It is the Christening and 1st Birthday. I ask her if there's a theme so that I would match her theme to the color decoration. And we come up to the dark blue, light blue and white. She chose the scalloped circle for the banner. 


I used my buddy baby Silhouette Cameo to cut perfectly the scalloped shape and the round circle shape too. And also the font. I am so really really happy and love having a digital plotter to cut for my projects. Though sometimes we encounter a problem later on I know how to solve it. I love my babies so much. Silly and Biggie.


I insert or add a small scalloped circle in-between Happy , 1st and Birthday. And it is super cute!


I used the double adhesive tape to the cut-out letter to add some dimensions. Using the Fiskars Sweat Pea Clear stamps button and Studio G White for the stamping. I used the Satin Sensation for the ribbon. And I like this brand that I bought. It is 3/8 inches and 15 yards.


This is the door sign. I would suggest that there should be a door sign if there's a celebration happening to your house or a place. Because it is a Christening and 1st Birthday I use the description as "Blessed day".  My husband suggests that I should use the solid color for the balloons. Hmmm maybe next time I will do it. 


I really like my birds here. I put some dimension on the wings and tails.


And of course the materials are from ACMoore. We are so lucky that time because the ACmoore has 50% off on their bazzil cardstock. Would you believe on that! Oopps I forgot to mention my Pink CGull that always assist me to "lift me up"!


Happy Blessed day!


My Wish(es)

Though it is not yet Christmas but I am starting to say my wishes and I really wanted to have it. Like a kid I have things that I wanted to have. But due to not working and our budget is not enough I am waiting for the good timing. My greatest virtue is I am very patient to have "my wish/es". And I gonna have those in good deeds not in wrong doing.

What are my wishes?
1. A job! Of course..I should have a job so that I can buy what I want and when I want to buy it. Send money for my family and not waiting if we have extra money or budget.
A job is the most important so that I can do the buying and selling. I am in two online auction and I know how to do the pricing. I have lots of ideas what I want to sell.
A job so that I can save money for our future and I can visit my family with my own expense.
But if I have a job I wanted it near to where I lived. Because I do not know how to drive. Though we have now extra car that I can drive but the problem is it has lots of things to do with it. And I need to pay my insurance.
     I wish I have a job and / or money so that I can apply a job anywhere.

2. Now if I have a job then have an extra money then I would start the buying and selling. I've seen those "moving" that selling their scrapbook things. Every time I saw these I said "I should have money so that I will buy those and sell it". I know there's a money on it. And some items I will use to continue my paper craft business.

3. For my Paper Craft business, I am going to continue doing it. I love making cards, banners and decorations.
         3.1 I will and it is included in my wish list is to have and or buy COLORED PRINTER. I have printer here but only for black that's why my card is very limited. I can't print the font or message in colored. The printer that I wanted to buy is the Epson WorkForce 545 All-in-One PrinterCopier/Fax Machine/Scanner

        3.2 I will buy a Lifestyle Craft Letterpress Starter Kit. I like those result that prints and press. I had already a Bigkick machine so I don't think I should buy the pressing machine. And I love my buddy Bigkick!

         3.3  I will or not invest or buy cardstock in online store
         3.4 I want to have any Embossing Heat Tools.

4. I want to become a "Drop shipper". I am in Papercraft world and there's a lot of supplies or craft that looks cute and very useful. And for me I want to sell it. Like the Lawn Fawn, the Martha Stewart, Sizzix, Cuttlebug, Darice, Uchida and so so. I want to sell those but I do not want to look for the supplier. If I am going to sell scrapbook supplies I want to direct to the manufacturer.

5. Oh i love shipping my items. It makes me happy. Printing the invoice and shipping labels. And it is also included in my Santa Claus wish list that My Papercraft business and some items in eBay would be prosperous. I want to become a successful business woman.


hmmm I forgot what else.. I am praying I can get a job near to my place.


Thursday, September 6, 2012

Baby Shower Banner for a Boy


Hello everyone again!

It's been a while that I didn't post here. Well, I am busy.

Remember my It's a Girl Baby Shower Banner?Well, while I am out of town or in Florida with my husband there's one customer asking for a version of banner for a boy. 

There's lot of design in mind that I want to create but this one that has a collar is the one that I want really to make. I was challenge. Good that I have scratch papers for my samples which cut and fold and sizing if it is good for banner. When I got the right size then I said this is the correct size pendant for my banner. But I noticed I will have only 2 cuts for 12 x 12 cardstocks. So I think again how I will do it. What I did the collar was not included on the polo shirt on cutting it. In my Silhouette Cameo program, I edit my design. Cut the collar on  it and put some wholes or circles as my stitching guide. So on the 12 x 12 cardstocks instead of 2 polo shirts I have now 3 cuts of polo shirt in 12 x 12 cardstocks and 1 piece of collar only. After my Silhouette Cameo cuts all the shapes including the collar I fold it and use the DMC thread to sewed on the shirt and the collar. In my design, I wanted to include the sewing design/style/technique. So I sewed the collar and shirt plus the sleeves. It is so cute on personal. 

Let me say, in this design I want to incorporate the the polo shirt design, stitches technique and the assorted cute button. 

It come up like this. These are so cute. I used the DCWM cardstocks. Special patterned and glittered or dry embossed cardstocks.


Each pendants measures 7.74 " and 5.50". I used the nylon dot ribbon size 5/8" only.
I really love this banner. My version for Baby Boy.

Thanks for looking and happy crafting


Friday, August 31, 2012

Coupon

We went to Acmoore, Shrewsbury NJ. It is great that I have $10 off when you purchase worth $25.00. Before we off I check first if I save coupon. I check on my emails and that's it. Only for August 30 I can use my $10 offd. What a great day isn't it?

My husband help me to locate where are the products. The store change their layout for school supplies buyers. My husband asks me what are the things we are looking or buying. So I said cardstocks only for boys. And we look around. I thought I will be empty handed and he keeps saying that "maybe it is on the wrong placed." So I check each pile and voila! One of the cardstock was put on top of the DCWC for Baby Boy. And we look around again because I need to buy or get more so that I can use my coupon. Then I have Darice Embossing folders. I like it so much and cheap. Embossing powders and the Double Sided tape.

Oh I love coupon so much and I love Acmoore.

Sunday, August 12, 2012

Christmas Banner#1


Hello everyone! I am here again for Christmas preparations. Now I am starting for a banner. I'm done on creating a samples so now I will start making a banner out of those sample pendants. 
I ask my husband which of those samples he likes so he choose the one that has an oval scalloped shape but there's some changes. Like the flowers. He prefer the holly berries. And the font should be more solid color. He likes solid colors. 

So for this Day 1, actually I start last night writing my TO DO'S. Using my Silhouette Cameo machine it or I cut first the berries. Because I'm going to put red glitter and Glossy accents on it and dry it for an hours. 

So, below pictures are my berries. It measures .75". My first time doing it. Some were flats and some were good. I overnight drying it. 


These are materials I used. I am going  to like the Glossy accents. I got this idea from tutorials. Thanks ladies who always uploaded their videos on Youtube. I bought the Glossy Accents in Acmoore, Shrewsbury. They have that size and it is on SALE! The red glitter is from A and P shop. The cardstocks from Staples.


Happy Crafting!


Thursday, July 19, 2012

Preparing for Christmas.

Would you believe that I am now preparing for Christmas?When the summer comes I am thinking or planning that I will make a Christmas craft earlier. Then because I am IN in the group of Tophatter and crafts  I found out that they are now preparing and starting for Christmas. Whoaa!!!
My brain is running and thinking what would be. I have lots in my mind so when I start holding my tools oh my everything was jamming like paper in the printer. I have to hold on and relax so that it will come up good, right?
So I am planning to make

  1. Christmas Banner a "Merry Christmas". I will have that, of course, in our apartment, my family in Philippines. And I'm gonna ask my in-laws if they want.
  2. An enveloped for money or we can "ampaw" in Philippines. This is difference most especially the print design. It would be Christmas spirit. Because when I was in the Philippines my family always bought that has a Chinese characters logo. I need red paper not a cardstocks, right? And I need a stamps something Christmas.
  3. Christmas Cards with Enveloped.
So in this day 1, July 19, I have now a sample for banner. A miniature for a banner.


From Silhouette Cameo image and the green stocks embossed using the Cuttlebug. I spray the green cardstock using the Perfect Pearl Mists Sour Apple from Ranger. It comes beautiful. First I used it bought from Michaels. I love it so much. Punch using Recellections. So lovely. I don't have snowflakes so for the meantime I will use that. And adhere it with Rhinestone. By the way, the size of this is 3x4 inches, My miniature sample banner. Oh I really love it. I hope when I finalized it it would come up to my expectations.


I used the Recollections premium cardstock Red, Green and Brown. For the glitter is from DCWV The Glitzy Glitter Stack 24 sheets from Michaels. I bought my rhinestones in Acmoore and Tophatter.

I love it so much!

If you have any suggestions you are welcome to post your comments. 

Day 2

These are the pennants that I finished when I continue. 
For every pennants of I want to make a different style so that I would know which is the best. 


E is something white and snow only. I wanted this to be like in a wooden grain stamp but because of my limited budget I used my Texturz Sizzix plates and inked it using coffee bean. 

For R, I want to put the poinsettia flower on it. I am thinking which is best if it is the coffee bean or the white around the petals of the poinsettia.
When I am doing my craft I noticed that I am not on my focus. In my mind I have this design but while working on my design it always changes. Or might be, my eyes telling me the design was not fit to the style. My eyes and my mind were contradicting to each other. 

Still more to go..

Day 3

Another design for this season. I saw some designers used buttons on their cards. And while I am thinking what would be my design and adding the buttons on it then i saw a designer adds buttons on her cards. so I said wow! and now I add buttons on my Christmas banner. 


This design was not on my list. But I saw this shapes on my box so I said why I used this shapes. That's it! A lovely and elegant pennant for this holiday season.


Happy Crafting!

Monday, July 9, 2012

Anything goes for Baby Girl

Here's my cute pennants for baby shower. I designed my own pennant or shapes and use beautiful cardstock that has designed and glitters. 
Last few weeks this makes me busy. I make a rush just to submit this on the Tophatter Live Online Auction. I bought all my materials in ACMoore and Joann's Fabric Stores. I chose this cardstock to make it really look like a dress of the coming baby girl and match to our season today. I really like this design and this is my own design. 
Pennants are made from premium, special and glittered cardstocks. 


These pennants size are 5.25 inches


Fonts size is 72 pt with two different color premium cardstock.


Ribbons are made from gross grain materials. And I add bows in between of the words. I sewed it instead gluing it to make sure it won't fall out. I like how made my bows it. A copied it from the Youtube tutorials. 

Here's the finished product of my banner. So cute isn''t it?


Banner is 6' 8" long

The close up picture of my baby girl banner


If you like to have this for you party like baby shower, birthday just email me.

I forgot that I should add or make an invitation card for the banner that I made. I made two type. One is the background is brown and the top and pink same with my font in the banner.

And this is the second type of style of this card. The top is white and the background is in different color. So that the customers will choose which color they want or they will prefer mix of different color.